In this post, I’ll walk you through the process of preparing pie dough from scratch, without the need for a food processor, stand mixer, or any other fancy equipment. This versatile dough is suitable for both sweet and savory pies, making it your ultimate choice for a wide range of pie recipes.
All in all, this recipe is incredibly straightforward and consistently yields fantastic results. The pie crust it forms is not only flavorful but also wonderfully flaky and easy to work with. If you’ve never ventured into making your own pie crust, now is the perfect time to give it a shot! The ingredients are budget-friendly, and you have the flexibility to adjust the level of salt or sugar to your personal taste.
While this recipe is vegan, you have the option to use margarine or real butter. The preparation steps remain the same, whether you opt for the vegan or non-vegan version.
I’ve borrowed the ingredient proportions from Anna Bergenström’s book ‘The Little Pie Book,’ but the instructions and dough-handling tips are entirely my own.
So, let’s get started!
Table of contents
- Essential equipment
- How to choose the right flour for your pie dough
- How to make the perfect pie dough from scratch
- An alternative: Making the dough with a food processor or blender
- Rolling out the dough and transferring it to the pie pan
- How to decorate the edge of your pie
- Pre-baking the pie crust
- How to feeze pie dough for future use
- Recipe
Essential equipment
You can easily prepare this pie dough even at your cabin because you don’t require any special equipment. All you need are:
- A bowl (or any suitable container, even a pot)
- Two dinner knives
- A measuring cup for flour
Really, these are all you need!
How to choose the right flour for your pie dough
Preferably, use all-purpose white wheat flour for the pie crust, especially when making a sweet pie like a pumpkin pie.
However, if you’re looking for a healthier alternative for savory pies, whole wheat flour is also an option. Whole wheat flour creates a very tasty and tender pie base!

How to make the perfect pie dough from scratch
Measure the flour into a bowl and add salt or sugar, depending on whether you are making a savory or sweet pie.
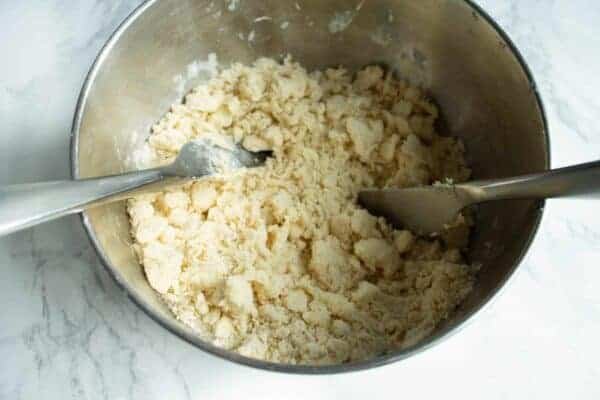
Measure refrigerator-cold (vegan) margarine or butter. Cut it into pieces about the size of a tablespoon, as shown in the picture, and distribute them evenly on top of the flour. Avoid handling the margarine with your hands to prevent it from heating up or melting; it should remain as cold as possible.

Next, take two dinner knives and use them to cut the dough until it becomes crumbly and smooth. Achieving a uniform mixture where the margarine blends evenly with the flour is crucial for a good end result.
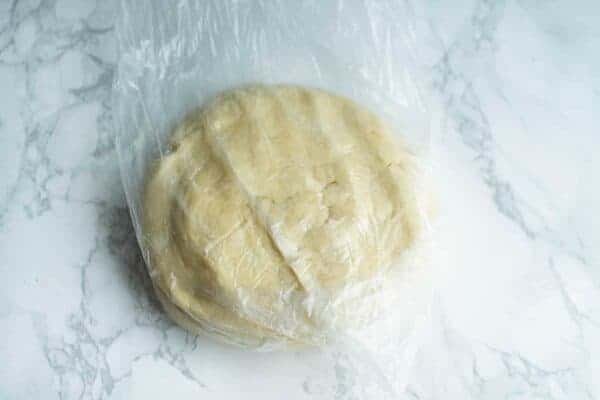
Now, take a few small portions of cold water in a bowl and add them, roughly a tablespoon at a time, to the flour mixture. After each addition of water, use a knife to gently stir the dough in a clockwise direction. If the dough is still dry and crumbly, add a small amount of water and stir the dough again. When the dough is ready, it will begin to come together into a loose dough ball, as shown in the picture below. Be cautious not to add excessive water to avoid compromising the dough’s consistency.

Transfer the dough to a small freezer bag and shape it into a round ‘puck’. If you can’t find a freezer bag, you can also shape a disc on the bottom of a dough bowl.
Move the dough disc to the refrigerator for half an hour or to the freezer for 15 minutes before use. The dough is then ready to use.
An alternative: Making the dough with a food processor or blender
If you’re using a stand mixer, food processor, or blender, follow the same steps as mentioned earlier by adding the dry ingredients and margarine. Then, gradually pour water through the hole in the machine’s lid while it continues to process the dough.
Stop the machine as soon as the dough begins to come together into a loose ball. This typically takes only about 10 seconds in total.
Rolling out the dough and transferring it to the pie pan
In my experience, the simplest and most convenient method for rolling out the pie crust is to do it on a sheet of parchment paper. This not only aids in transferring the dough to the pie pan but also makes cleanup a breeze. You can simply discard the used parchment paper, and there won’t be any dough or flour residue left on the countertop, which would otherwise require washing.
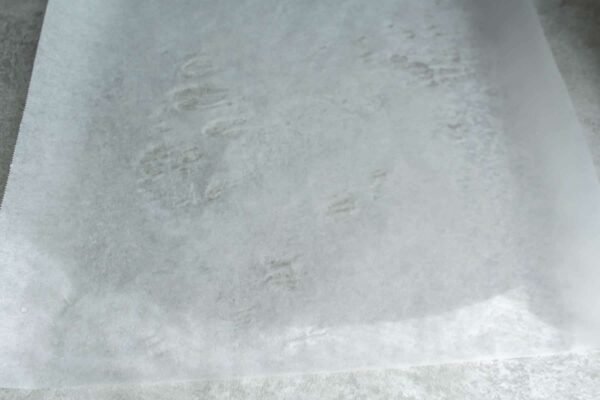
Pro Tip: If you find that the parchment paper is slipping on the counter, lightly sprinkle a few drops of water underneath it, as shown in the picture below.
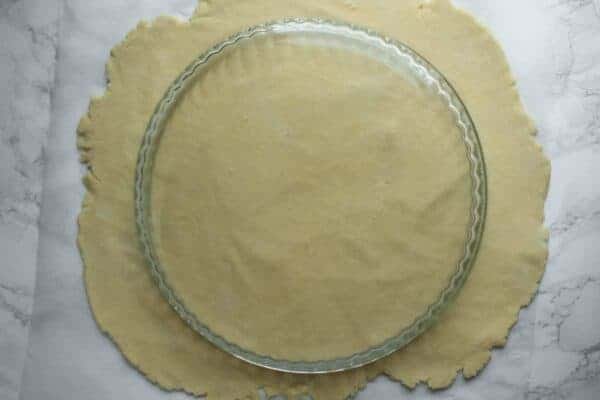
Sprinkle about a teaspoon of flour onto the parchment paper before rolling out the dough.
Roll the dough disk into a slightly larger disc than the pie pan. You can check if it’s the right size by placing the pie pan on top of the dough. The dough should extend just slightly beyond the edges of the pan.
Note: If you’re using whole wheat flour, the dough may tear more easily while rolling. Simply press any tears together and roll over them again. Additionally, you can patch any torn areas even after the pie crust is in the pan.
Once you’ve rolled out the pie crust, place the pie pan on top of it with the inside facing down. Then, place your other hand under the parchment paper, positioning it in the center of the pie pan to support the bottom. Finally, turn the pan with the parchment paper so it’s right-side up. Try to perform this step swiftly to prevent the dough from tearing.

Now that the dough is inside the pan, press it down gently to line the bottom and sides of the pan. You can also easily mend any tears or imperfections if the dough has torn at the edges.

Cut the excess strips of dough from the edges along the outside of the pan. However, leave enough dough to shape the edges as desired.
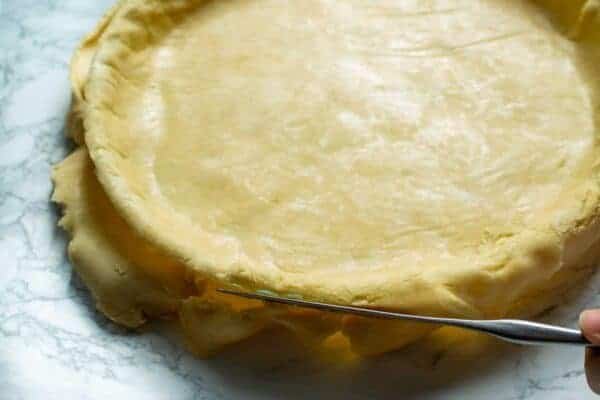
Tip: You can use a mold to create decorative patterns from the remaining pieces of dough. These can be added as decorations on top of the pie or baked separately on a baking sheet.
How to decorate the edge of your pie
If desired, you can create decorative patterns on the edge of the pie before baking. For example, you can use your fingers to create a crimped pattern like this:

Pre-baking the pie crust
In most cases, pie crusts made with this recipe typically don’t require pre-baking – I’ve found it unnecessary. Pre-baking a pie crust is usually done to ensure the edges maintain their shape during baking, but with this dough, that hasn’t been a big issue.
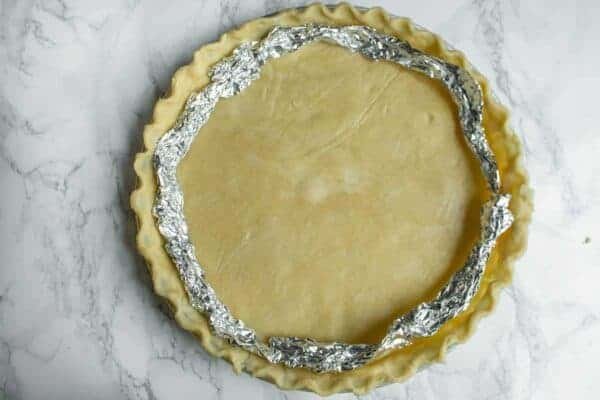
But if you want to make sure the final result is spot-on, pre-baking is really easy to do:
- Support the edges of the pie crust with foil.
- Place the crust in the oven without any fillings and bake for 10 minutes.
- Remove the foil, add your desired fillings, and continue baking.
How to freeze pie dough for future use
The finished disc of dough can be frozen for later use. You can prepare any number of these in advance and freeze them for future use.
Before use, thaw the dough in advance, either by allowing it to naturally thaw or using a microwave oven with the defrost setting.
Print
Easy Pie Crust step by step
- Total Time: 30
- Yield: 1 1x
- Diet: Vegan
Description
Bake sweet and savory pies effortlessly with this reliable, versatile, and tasty pie crust recipe.
Ingredients
- 3 dl all-purpose wheat flour
- for the salty pie crust: 0.25 teaspoons of salt
- for the sweet pie base: 2 tablespoons of sugar
- 150 g of refrigerator-cold margarine
- 1 – 2 tablespoons of cold water
Instructions
- Measure the flour into a bowl.
- Add salt OR sugar, depending on whether you are making savory or sweet pie dough. Mix well.
- Add refrigerator-cold margarine about a tablespoon at a time. Avoid handling the margarine with your hands to prevent it from melting.
- Cut the dough using two kitchen knives until it becomes evenly crumbly.
- Add cold water one tablespoon at a time, and after each addition, use a knife to rotate the dough clockwise. Stop adding water as soon as the dough starts to form a loose ball.
- Place the dough into a plastic bag and gently press it from the outside to shape it into a round disc.
- Chill the dough disc either in the refrigerator for 30 minutes or in the freezer for 10 minutes before use.
- Preheat the oven to 200 degrees Celsius (or 400 F).
- Roll out the dough into a thin sheet and use a pie pan to measure the correct size.
- Carefully transfer the sheet of dough to the pie pan (refer to instructions and photo above).
- Press the sheet of dough onto the bottom of the pan and trim any excess dough from the edges.
- Shape the edges of the pie dough, such as by crimping (refer to instructions and picture above).
- If you want to pre-bake the pie crust, support the edges with foil and bake the pie crust in the oven for 10 minutes.
- Remove the foil, add the filling, and continue baking. Bake the pie crust for a total of 25-30 minutes; if you are pre-baking the pie crust, subtract the pre-baking time from the total baking time.
- Prep Time: 10
- Resting time: 30
- Category: baking
- Method: in the oven
- Cuisine: General
Keywords: easy vegan pie crust, vegan pie crust savory, homemade pie crust, how to make pie crust from scratch, how to make pie crust by hand, how to make pie crust step by step
If you liked the recipe, please share it!💕You can also rate the recipe and leave comments below ⬇️